The role of a Solutions Engineer (or of any salesperson, really), has to do with asking questions. Asking the right questions at the right time to the right person in the right way.
That’s why the SE role and sales in general is very much in the Socratic tradition. Asking questions to uncover the truth. But also asking questions designed to convince the interlocutor.
Sure, asking questions elicits information that’s useful. But that’s only one reason.
It also gets the customer to think and come to conclusions that they “own”, i.e. they believe they arrived at these conclusions on their own and are more committed to them. This is the IKEA effect. By framing questions correctly, you can guide their thought process and their conclusions. Very Socratic.
It tells the customer that you “get” them. You earn their trust and they’re more likely to buy. Of course, this only works if you are truly listening to your customer, and you really do care about their needs and priorities. If you don’t, you’re found out pretty quickly.
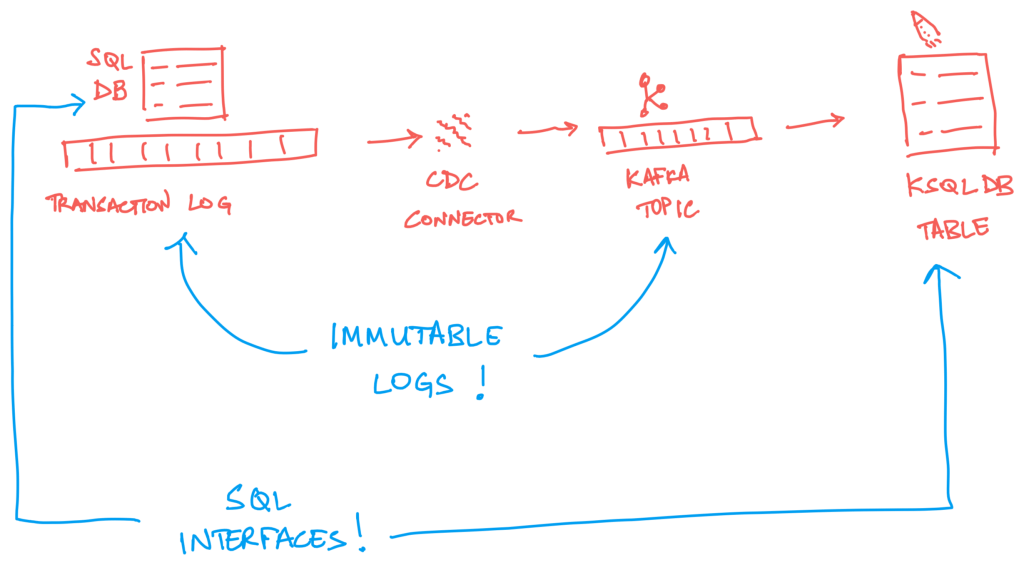
The presence of the relational databases in most businesses’ data architectures has meant that most businesses looking to use Kafka to implement event sourcing (see Martin Fowler’s article on Event Sourcing) have adopted database Change Data Capture (CDC) connectors for Kafka built on the Debezium project.
Debezium works in a really neat way – by pulling data from the database’s binary transaction log. And coupled with Kafka’s connect API, it can stream to Kafka, events representing changes made in the database.
What I find interesting is that the pipeline of producing events from the database transaction log is the mirror image of a ksqlDB table abstraction formed from the events in a Kafka topic: CDC gets events representing state changes from a data system that’s primarily designed to give you a current state, while a ksqlDB table does the opposite – gives you a current state from a log of sequential events leading up to that state.
“SQL to SQL, Log to Log“
There are only a few parameters / properties you need to set in the database and in the Kafka topic to get stream data change events to Kafka. The most interesting ones are:
Set the Kafka topic’s cleanup policy to compaction instead of delete. This way when a database row is deleted and the connector produces a tombstone record, it marks the record for deletion when it’s time for a cleanup.
Set after.state.only to false to get the before and after state of the record that was updated – so that you know which specific fields were updated. This way you could reverse events to get back to an earlier state.
In my last two posts, I looked at why SEs (and sales executives) need to take notes and share notes, and what they should record in their notes.
Here’s another question, though – how and where do you take notes? Do you type them up in Google docs or Notion? Or do you handwrite them in a notebook or with a stylus in Nebo, OneNote, or Apple Notes?
I love taking notes on paper. Nothing beats the tactile feel of writing on paper. But we live in the real world, and you’ve got to ask yourself what our constraints are. Here are the constraints on my notetaking:
Do we want our notes to be searchable?
Do we want to be able to share our notes?
Why are we taking notes – To record as much info as possible? Or to absorb information as we hear it and record just the important bits of it?
Let’s look at the first point – If you want your notes to be searchable (or shareable), as I do, then taking notes on paper is out.
If you’re an SE or AE and you’re taking notes during a customer meeting, chances are you want to share your notes or record it in a place where it’s accessible by others working on the account.
No man is an island entire of itself; every man is a piece of the continent team, a part of the main;
So, it’s best to use a tool that your team already uses. In many cases this will be Google docs. If on the other hand, you’re taking notes in an internal meeting and if it’s not a live doc meeting*, then you’re really taking notes for yourself, not to be shared it with anybody else. This opens up a whole gamut of new-fangled note-taking apps for you to explore. Pick what you fancy.
Then we get to the third question – are your trying to record as much as possible, or are you trying to learn? This determines how you take notes. Studies have shown* that hand-writing your notes helps you retain information better and longer. Typing your notes doesn’t have that advantage but you can type faster than you can write, and you can record a lot more information. In your first few meetings with a customer, you have a lot to record, and you should probably type. In later meetings where you don’t find yourself recording a lot, or at times where you’re meeting a customer in person and it looks rude to stare at your screen typing, you can use a stylus to write up your notes. You could use Apple Notes, OneNote, or Nebo. This isn’t supposed to be yet another Apple vs Microsoft vs Google discussion – pick whatever works for you.
Here’s what’s worked for me – type notes in OneNote (not just for meetings notes but also to record ideas) and, in case of customer meeting notes, copy them later to a shared Google doc. It gives me the option (though seldom exercised) to pull out a stylus to take searchable hand-written notes or draw a diagram in OneNote on my iPad when the need arises. The process of copying notes to a shared doc, also forces me to review and organise my notes after a meeting.
* Live doc meetings are an interesting way to conduct meetings – that probably deserves a future post on the subject.
* I am sceptical every time I read “Studies have shown …“, as should you be.
Most of us never give much thought to how to best take notes. We’ve been taking notes since we were in primary school and some of us stopped along the way but if you’re in complex sales you’ve continued or restarted notetaking simply because someone on the team asked you for your notes on an account. Just as in school, you settled into a familiar or easy notetaking style. When I started as an SE, I thought about how best to take notes that are useful and concise.
When you’re new to a topic, you don’t know what’s important and what’s not, so you end up writing everything, not knowing what you might need in the future. In the process, you spend your attention writing or typing everything that was said, rather than understanding what’s being said and mentally preparing your response. That is not the most effective notetaking style, but, understandably, you’d adopt this if you’re just getting started. It’s important to move to a style where you’re mentally separating the wheat from the chaff and just note down what’s important to remember later. The chaff here doesn’t represent just the unimportant stuff but also points that are easy to remember or figure out later.
Once you’ve led enough customer calls, you’ll begin to see patterns. If you compile these patterns (such as objections, signs showing a lack of understanding of the product or lack of belief in the value delivered, etc) and a list of potential responses for each, it could help you think on your feet about how to respond, while your hands are busy taking notes. In the process, you will take better call notes.
Studies have shown (and if they haven’t, then they ought to show) that eyewitness testimony has a shoddy track record. That is because not only is our memory bad, but also that we have no idea how bad it is. Like our sense of free will, our memories too, are so integral to who we are that we don’t doubt them because doing so would almost deny our sense of self and mean that we don’t know who we truly are.
The further back in time we go, the worse our memory gets. We even make up completely fake memories to fill in gaps or to give meaning to our experiences. For example, I have memories of visiting Singapore when I was a toddler, but in reality, my parents didn’t take me along – they left me in my grandmother’s care. My brain just made up the memories of Singapore based on what I learned about their visit.
Our memories diverge from reality even further when the experiences they are based on are emotionally charged. Our incessantly chattering mind creates and reinforces narratives which forge new memories as evidence to support those narratives. And as much as we want, we cannot check our emotions at the door (or at the Zoom meeting Join link) when getting into a work meeting.
Sales can be a high-adrenaline, high-cortisol field and relying on your memories alone to recollect what happened in a sales call with a customer is a terrible idea. That is why it is so important to take good notes in sales.
Since the late-2000s I’ve been interested in David Allen’s Getting Things Done philosophy and methods. I always found it difficult to follow strictly, though. So, while the fundamentals of GTD are sound:
Our brains are for having ideas not for storing them, and
We need a reliable system to store those ideas and to remind us of them when we need.
I felt the GTD methodology itself needed changes. One of the reasons I felt it needed to be changed was that it was just a lot of work. So I made an addition to these fundamentals:
For a system to be reliable, it should be easy to follow, taking up less time to organise allowing you more time to do the actual work.
I also felt that there was something else that bothered me about GTD. For one, most GTD tasks are divided up into projects and all of them are also divided up into contexts that are based on our constraints within which we can do those tasks. I found that today the vast majority of our tasks can be completed online and since we’re always online, we’re not constrained anymore. Any constraints we have for online tasks are not placed on us but we place on ourselves to maintain our sanity and peace of mind. That’s when I saw this blog by Carl Pullein. Carl talks about how you can drop the contexts and organise tasks by when you need them done instead:
This week
Next week
This month
Next month
All these tasks can go into a calendar app or a list or to do app like Microsoft To Do or Google Calendar. Since I use Google calendar for work, I end up opening Google Calendar every half hour anyway during a regular work day, so I just add my tasks to my calendar as a task. I’m sure there are better Task management apps that might work better for others but this one works for me because I don’t need to open yet another app.
Almost a year ago, I had written about how I had joined a team that was so supportive of my personal and professional growth and from whom I could learn so much. And I have learned a lot and grown. I have since decided to change tracks a bit and I am now a solutions engineer at Confluent.
Having been in tech and in sales before, I know I’m well suited to the role but this is still my first time as an SE. So I am trying to learn as much as I can and am going to spend my next few posts on being a successful SE.
Confluent offers Confluent for Kubernetes (formerly Confluent Operator) with its Enterprise licence. While Kubernetes is great for running cloud-native stateless workloads, companies have been increasingly implementing their data solutions on Kubernetes, too. For Confluent, it is important to provide a serverless experience of Apache Kafka to its users. It is challenging to implement a distributed stateful system like Kafka as a serverless offering. This brings up issues like expanding and contracting clusters elastically without any downtime, keeping the storage in the cluster balanced, etc. To achieve this, Confluent uses Kubernetes.
StatefulSets
To run its Brokers and Zookeeper, Confluent uses StatefulSets, which are like Kubernetes Deployments, except that the StatefulSet is designed to run stateful workloads. They key difference between stateless and stateful workloads is that while a stateless workload can be replicated to multiple instances, each of which do the same thing, instances of stateful workloads though, must have sticky identities. For example, pods of a database cannot afford to be identical because while they can all perform read operations, they cannot commit writes all at once – doing so would result in inconsistent data (violating the Consistency principle of ACID transactions.)
So, the pods that Deployments spin up are identical to each other, but pods brought up by a StatefulSet cannot be identical – they are ordered. A Deployment’s pods have names with random hashes at the end but the names of a StatefulSet’s pods have appended to them ordinal numbers that define a 0th pod, 1st pod, etc. Pods of a StatefulSet start up and shutdown sequentially. The 0th pod must come to a ready and running state before the 1st pod is started. They also have a sticky identity so when a pod dies, it gets replaced by a new pod with the same identity and with the same Persistent Volume Claim.
Confluent for Kubernetes uses StatefulSets for Kafka brokers and the Zookeeper.
Confluent Operator
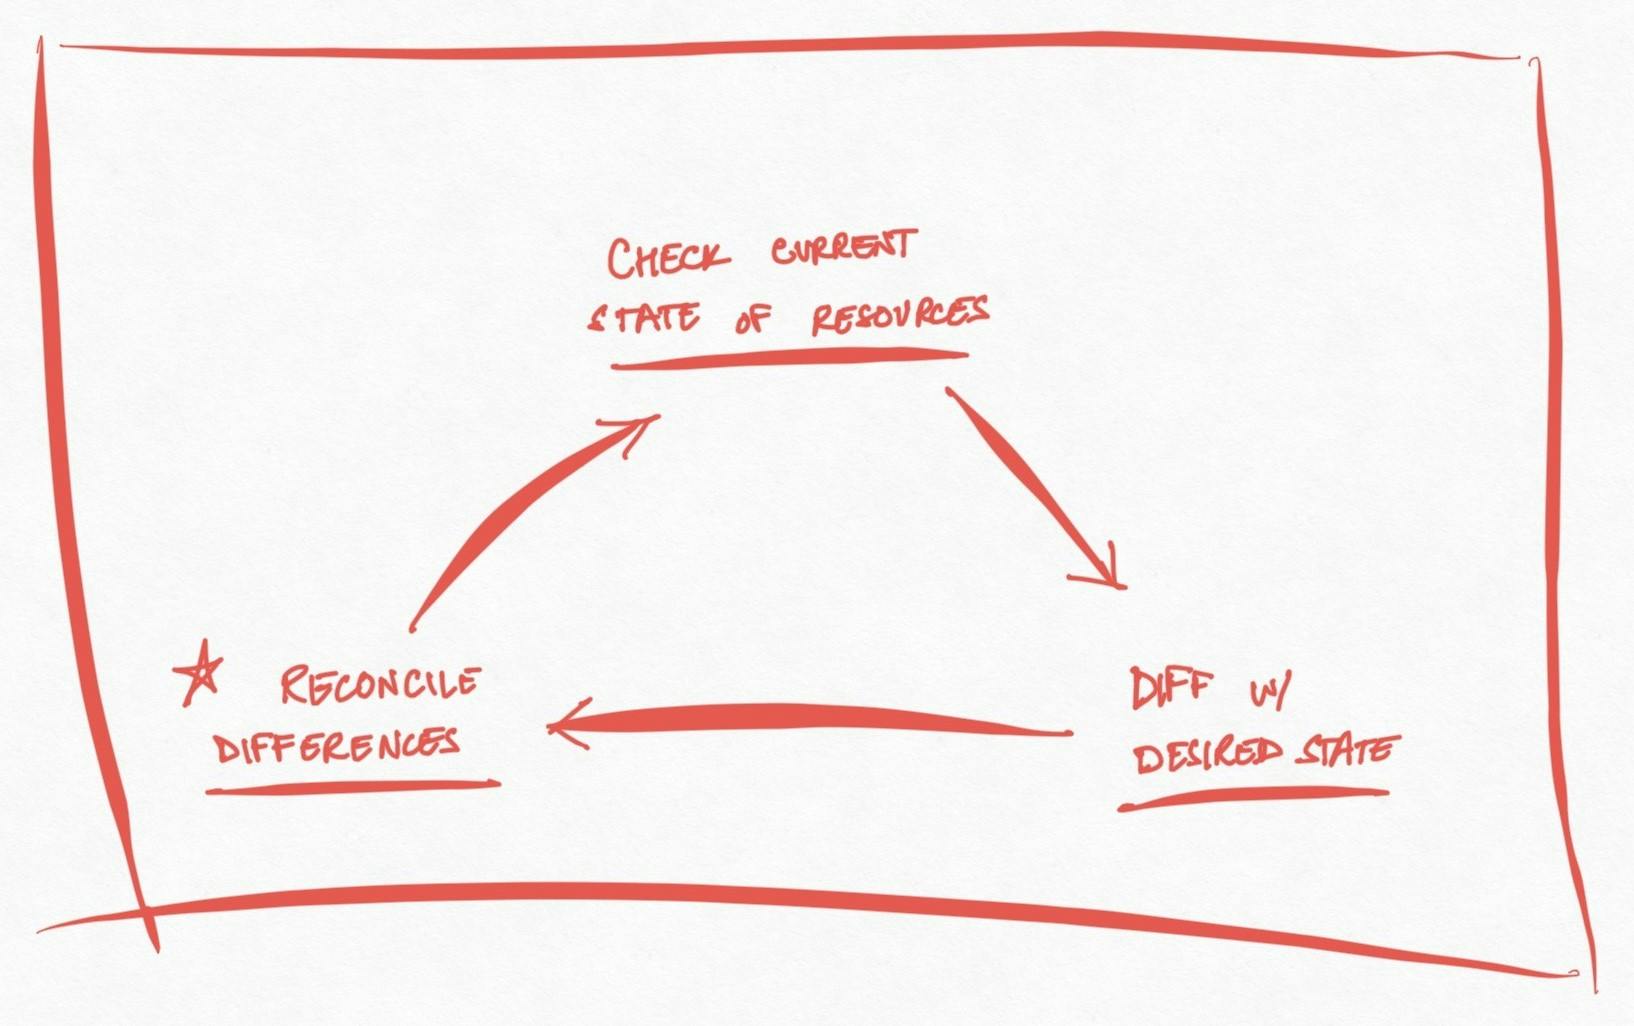
In order to allow users to manage Confluent Platform, Confluent for Kubernetes exposes custom resources that it has defined, and implements the Operator pattern employed by Confluent Operator. Managing stateful applications in Kubernetes without a Kubernetes operator is tricky since the Kubernetes orchestrator does not know how to start up, update and shutdown the instances of the application. The operator pattern effectively automates the work of a devops operator.
At its heart, Confluent Operator defines custom resources and links them with with a controller running the control loop:
observes the current state of the custom resources it manages,
checks how it is different from the desired state of those resources and
reconciles those differences by changing the current state to match the desired state -> This is the core of the operator.
This post is based not on any confidential material from Confluent, but from publicly available resources published by Confluent. *
This post was supposed to go out four months ago – last November: I’m now a Community Developer Advocate at Confluent! 🙌 🍾
I was thrilled then and I’m glad that I feel the same now. One of the things I love most about this new role is that it puts me in a team full of smart, bright people from whom I get to learn every day. I can definitely say that I go to bed smarter than when I woke up.
Besides, I couldn’t have asked for a more supportive team to be a part of – Not just supportive of individual needs and challenges, but more importantly supportive of personal and professional growth.
With all the challenges life’s thrown at me (and indeed at so many of us) the past few years – I’m glad I have my team at Confluent to depend on and learn from.
Try out VMware’s just released Tanzu Community Edition – A step-by-step guide.
Last week was a big week for VMware’s Tanzu. VMware released the Tanzu Community Edition, a full-featured kubernetes platform that you can use to spin up and manage kubernetes clusters on public or private cloud providers.
In this post, I will walk you through the steps I took to get a multi-node Kubernetes cluster deployed on my home lab using VMware vSphere and Tanzu Community Edition. You can use the same steps to try out Tanzu.
Hardware
I am using an Intel NUC 10i7FNH purchased on eBay. The processor is Intel Core i7-10710U (up to 4.7 GHz) with 6 cores.
Here’s a video of my installing the 500 GB SSD and 32 GB memory stick in my NUC:
You may want to add more RAM (and perhaps storage) than I did because with a 2 node management cluster and a 2 node workload cluster, it uses a lot of RAM:
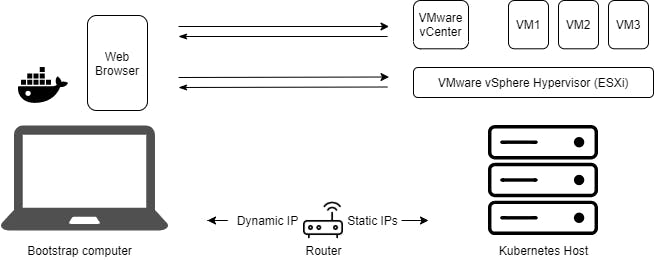
You will need a bootstrap computer with a connection to the internet to download ISOs, OVAs, container images, etc, and a private connection to your ESXi host. It helps if its running MacOS or Linux. If you are using a Windows 10 PC, you can easily enable the hypervisor in Windows and run Linux side-by-side on it. (I constantly switch between a Mac and a Windows PC with WSL2 running Ubuntu.) Here’s what your set up would look like when you’re done:
Network
At home, you probably have a router (or modem+router) that acts as a DHCP server assigning IP addresses to your phones, computers and other devices. Log in to your router and set your DHCP range to a subset of your subnet range. Ensure they are not completely identical.
Use Rufus to make a Bootable USB stick from the ESXi .iso file.
Stick it in the USB port and start the machine. It should boot into the USB stick. You can follow the instructions on screen to install the Hypervisor.
Configuring the hypervisor:
Configure ESXi to synchronise time with an NTP server. Also, configure your bootstrap server to synchronise with the NTP server. This will be handy later. If you are using a mac, it’s probably already synching with time.apple.com. On a Windows PC the default NTP server is time.windows.com.
Configure it to use a static IP address (i.e. outside the DHCP range) within the subnet.
Mount the ISO file (on your client bootstrap computer, not the lab)
To install vCenter with the GUI, go to your operating system’s directory in vcsa-ui-installer/ directory in the mounted directory and run the installer executable. While configuring vCenter, it is important to make a note of all the config parameters. The configuration may not work on the first attempt and it may need some trial and error. In most cases, you can use defaults. Create a table in say, Google sheets to list all your configuration parameters. Here are some pointers:
Assign a static IP address that’s within your subnet, just as you did with ESXi.
Enable thin disk provisioning so you don’t run out of storage space too soon. This does make disk usage more unpredictable, though – you may run out when you least expect it because it may give you a false impression of the amount of storage that is available, so keep an eye on disk usage.
Configure vCenter to synchronise time with ESXi
You can now log in to vCenter: Go to your vCenter IP address in your browser and launch vSphere Client. Remember to use the full username, i.e. username@domain, eg, administrator@vsphere.local
Change Configuration > Add new disk, Add or remove device, Advanced configuration, Change CPU count, Change Memory, Change Settings, Configure Raw device, Extend virtual disk, Modify device settings, Remove disk, Add existing disk
Virtual Machine
Edit Inventory > Create from existing, Remove
Virtual Machine
Interaction > Power On, Power Off
Virtual Machine
Provisioning > Deploy template
Create a user that you can assign this role to. Go to Administration -> Single Sign On -> Users and Groups create a new user.
Assign this user and role to your host, storage and network. In your Hosts, Storage and Networking views, right-click the main host, datastore and network respectively, select Add Permission and assign the user and role you just created. Select Propagate to children when doing this.
Make a template for the kubernetes nodes OS
Download an OVA file that matches the OS that you want to run as Kubernetes nodes. You can download the OVA files here .
In the hosts and clusters view in vCenter client, right-click on the host and select Deploy OVF template. Select the OVA file you just downloaded and continue to deploy a VM from the OVA.
When the OVA is deployed, right-click the VM and select Template -> Convert to Template. (Don’t start the VM before you convert it.)
When prompted for the file to save the key, you can press Enter to choose the default id_rsa. Enter a password for your key pair.
Add your private key to the SSH agent on your bootstrap machine and enter the password.
ssh-add ~/.ssh/id_rsa
Deploy a standalone k8s cluster
Start Docker on your bootstrap machine and make sure it can connect to the internet to pull container images.
Start the Tanzu browser UI on your bootstrap machine to create a standalone cluster:
tanzu standalone-cluster create --ui
In the browser UI, select VMware vSphere: Deploy
Enter your vCenter IP address, vCenter SSO username and password and click Connect
Choose the ‘Datacenter’ (that’s your host) and in the SSH Public Key field, paste in the contents of the ~/.ssh/id_rsa.pub file that was created in step 2 of Creating an SSH key pair.
Select a small instance type under Development, a standalone cluster name, a static control plane endpoint IP address from the subnet. Leave the endpoint provider as kube-vip.
Under the Resources section, choose the VM folder, the datastore name and host IP address that you configured when setting up the ESXi hypervisor.
You can leave the default values in Kubernetes Network settings, disable identity management settings and under OS image, select the template image you created for the kubernetes nodes OS.
Finally, review the settings and before deploying the cluster, study the CLI command equivalent. This command shows that based on your configuration above, the Tanzu standalone cluster installer has created a YAML configuration file, probably at ~/.config/tanzu/tkg/clusterconfigs/.yaml. This YAML file will be handy to make a config file for the workload cluster.
If you wanted to use Tanzu Community Edition with a public cloud provider, rather than vSphere, then you can skip most the steps above. You would only have to follow the steps in Download and Install Tanzu CE and Deploy a standalone k8s cluster. Instead of the vCenter SSO credentials in the first step, you will need to provide appropriate credentials for your account, for example, if you use AWS, you provide the AWS CLI profile which you create when you first configure AWS CLI on your bootstrap machine.
Instead of a standalone k8s cluster, you can also first deploy a management k8s cluster to help manage your workload cluster. This leverages Cluster APIs to deploy and manage your application workload cluster in a declarative way.
Using your kubernetes cluster
To actually use kubectl to talk to kube-apiserver on the cluster, you will need the cluster config. kubectl takes its configuration from the ~/.kube/config file. You will need to get the vSphere k8s cluster config here. To do that, run:
To verify that kubectl works, try using it to get details of resources on the kluster:
kubectl get nodes
That’s it! You can, now, deploy workloads to your kubernetes cluster using kubectl.
The experience
You are bound to encounter some hurdles along the way. The Tanzu team have ensured that the Community Edition installation and usage is relatively simple, and its configuration parameters have default values that work. It’s also easy to get Tanzu Community Edition working on public cloud providers. It is useful for developers to get familiar with Tanzu in small-scale or development environments. This further increases VMware’s reach and influence among the developer community.
The story with ESXi and vCenter, on the other hand, is different. You will encounter errors and the errors aren’t always self-explanatory. For example, a common problem that many find is that when installing vCenter the installation gets stuck at 80%, waiting for RPM installation to complete. This can get stuck at the same place for any number of reasons. To find the real cause, you will need to look at log files that can be cryptic and misleading. The vCenter documentation online isn’t very helpful to resolve these errors.
The release of Tanzu community edition is a welcome step. It lets many more learners hone their skills in a hands-on environment and allows developers to run compute-intensive workloads and proofs of concepts in pre-production environments.